Pages

Showing posts with label Give Thanks. Show all posts

SK112208


It's Saturday and that means another sketch challenge at Paper Craft Planet.  Tammy created this great sketch for us to play with this week.  There are already so many wonderful cards for your inspiration in the sketch gallery.  Check it out!


Here is my take on the sketch.  I played with my nestabilities again.  I don't use these cutting dies enough.  Each time I get them out, I love how my image looks.  Since next week is Thanksgiving Day in the US, I thought I would make a card for my in-laws.  We are going there to celebrate and they always make such a delicious meal.  I better get on my Wii Fit this week for sure to work off some calories before the feast...LOL!
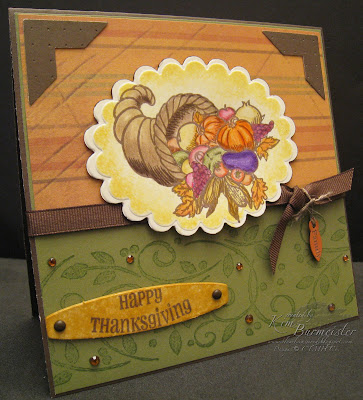

Materials used: 

Paper - CTMH - cocoa cs, olive cs, colonial white cs, Abundance pattern paper

Medium - prisma pencils, CTMH watercolor pencils

Ink - Memento rich cocoa, CTMH - buttercup, sunkiss yellow, sunflower, honey. olive

Marker - cocoa

Stamp sets - CTMH - Give Thanks, Say It In Sytle, SU - Leaves & Swirls jumbo wheel

Embellisments - CTMH - dimensional elements bookplates, autumn terracotta photo clip, cocoa ribbon, natural hemp, nature's ambiance rub-on, cocoa brads, Unknown - bling bought at Michaels

Tools - Large Scallop Classic Oval Nestabilities, SU photo corner punch, SU mat pack, paper piercer, sponge


Happy Stamping!

Technique Tuesday - Masking


Masking is a great way to layer stamps. I used this technique on this A Season of Gratitude card. I layered two of the leaves. The only extra supply you will need is a sticky note. Here are the directions:

Masking
  • Stamp the image you want to be in the foreground of your layers.
  • Stamp this same image on a sticky note. Make sure you stamp the image at the top of the paper, so the sticky part has some of the image on it.
  • Cut out the image on the sticky note.
  • Put the sticky note image on the stamped image on your card or layout. Ink up the other image and stamp part of it on top of the sticky note image.
  • The sticky note will protect your image underneath and when you lift it off the paper it will reveal a layered look.
  • Reuse the sticky note image as many times as needed until it does not stick anymore. You can keep this mask with your stamp set for the next time you want to mask.
Now, it is your turn!

Happy Stamping!

Technique Tuesday - Dry Embossing

I'm baaaack! I had so much fun at convention and created a lot of cool artwork that I can't wait to show you. However, it is time for technique Tuesday, so you will have to wait one more day. This is soooo easy and makes a card or layout look great. You can dry emboss with so many products. I chose to make straight lines that you can make using a Scor-Pal, your Fiskars paper cutter and scoring blade or an empressor guide and tool. Here are the directions:

Dry Embossing
  • Take your cardstock and place it on one of the above items. You will need to decide on spacing.
  • Drag your scoring blade, empressor tool, Scor-Pal tool or even a dry embossing stylus along the edge or groove.
  • Keep moving your cardstock with the same spacing or varied spacing. You can stop at straight lines or make a grid. The possibilities are endless.
  • Lightly sand the paper to bring out the design. Do not sand too much. You don't want to rub off the raised lines.
Here is the card I made today using this technique. I left it simple, so you could see the background. It doesn't need a lot to dress it up.


For this card I used Give Thanks and Nature's Vein stamp sets. The colors are barn red, cranberry, goldrush, autumn terracotta, garden green and olive. I stamped Thankful on a spectrum pad.

In addition, here is one page of a layout I did a while ago that shows this same technique.

For this layout, I used solo "t", and Essential Alphabet and dimensional letters. The colors are moonstruck, clover meadow and grey wool.

Now, it is your turn!

Stop by over the next few days and see what I created at convention. It was awesome to create with 350 fellow consultants. I got a lot of new ideas!

Happy Stamping!