Pages

Showing posts with label Say It In Style. Show all posts

i miss you

When I saw this image All Smiles at DZ Doodles I knew I wanted to use it for a "i miss you" card. I miss Madison and knew this would be a perfect card to send someone, who I missed. I used my warm gray Copics on this image. When I walk the boys to school we see a cat, Dusty, almost every day and pet him. He is a combination of gray and brown, so I used those colors for this image. Madison had green eyes, so I wanted to use the same color for this cat, which made me think of this pattern paper from Emporium (CTMH). The other paper (baby pink, white daisy and sweet leaf) are from CTMH, but the warm gray is custom made. Yes, it is the first digital paper I made myself. I have been watching some videos on YouTube and I could not find the right color of gray to match my cat, so I made my own.

I purchased a digital swatch guide from Sally Lynn MacDonald, Inky Heart, and used the color W5 - Warm Gray to create my own texture paper.


Here is a close up of the warm gray paper I created. Isn't it cool? The only way you can tell it isn't textured, is to touch it. Love it!


Materials used:

Paper - Emporium (CTMH), baby pink, sweet leaf and white daisy cardstock (CTMH), W5 - Warm Gray texture (digital paper by Kim), Solar Crest white (Neenah)

Stamps - All Smiles (digital stamp by DZ Doodles), Say It In Style (CTMH)

Ink - Copics, black (CTMH)

Accessories - classic ovals and scallop oval nestabilities (Spellbinders), bigger brads (CTMH), pink gingham ribbon (CTMH), hologram glitter glue ( Stencil Scrapbook Collection), pop dots (SU)


Take time to create!

August Card Club

Boy, have I been busy! My mom came last week with five of my nieces and nephews, so my boys had five additional playmates all week. I thought seven kids in our house would be a tight squeeze, but it wasn't. The older girls seemed to have keep themselves busy with their ipods ad YouTube and the boys just played like boys do. The weather wasn't perfect for swimming, but they swam every day.

I did have time at my Saturday night crop to make the card for our August Card Club. On Monday, I made the gift card holder. I got that idea from Jen Tapler's blog. I try to match the card club projects with the scrapbook club when I can. Scroll down one post to see the layout that matches these cards.


I have been using a lot of punches, because I {heart} them! The paper is from the Good Times Level 2 paper pack and the stamp sets are Say It In Style and Thank You.

Happy Stamping!

Make a WISH

This is the layout my club members are going to make this Saturday night. I love this paper! It is from the Good Times Level 2 pack from CTMH. I got the layouts from the Reflections Scrapbook Program that CTMH sells. I used the layouts on pages 44 & 45. I love this program, because it has so many one page layouts that you can combine with each other to make great double page layouts.

I used chipboard letters for the WISH and stamped them with a polka dot in chocolate, sweet leaf, twilight and buttercup.


Check out the flower on this page. I love using my punches and this is definitely easier than it looks. I got this from Donna at SCS. Here is her tutorial. Fun to make! The tags that were left from making the flower, I used on the side of the layout for more embellishments.


Layout recipe: All products CTMH unless noted. Paper - Good Times Level 2 paper; Ink - white daisy pigment, sweet leaf, chocolate, buttercup, twilight; Stamp Set - Say It In Style; Accessories - Punchs from SU - small & regular tag, star punch, scallop square punch, 1" punch (EK Success), white gel pen (SU), white eyelets (unknown), white daisy sassy strands, chocolate bigger brad, chipboard letters, chocolate grosgrain ribbon.

See you Saturday night, Stampers!

Happy Stamping!

For You Friend

This week's sketch challenge is hosted by Lynn and here is the gallery for you inspiration to play along.

The card I made below is three fold.  First, I wanted to make something with the March stamp of the month, Butterfly Wings, for our club meeting next week.  Second, I wanted to play along this week for our sketch challenge at Paper Craft Planet.  Third, our theme this month at Paper Craft is friend/frienship, so I wanted to make something with that sentiment.  I hit all three....whoopee!


Those of you who are in my club....this is it!  We will be making a similiar card next week.  I really like the March stamp of the month.  The Butterflies are so pretty!  


Mom cam
Isn't the prisma glitter awesome?  It is the only glitter I use...love it!


Supplies used (All products are CTMH unless noted): Paper - Paper Garden level 2; Stamp sets - Butterfly Wings (March stamp of the month), Say It In Style, Adorable Backgrounds; Ink - Blush, Sweet Leaf marker, Sunkiss Yellow marker, Purple Pansy marker; Accessories - Petal bigger brads, prisma glitter, bling flowers (unknown)

There are even more reasons to stop by Paper Craft Planet.  Now, we are holding two new challenges a week.  Jen is hosting Scrappy Sunday and Adela and Sankari are hosting 3D Tuesday.  Check them out!  Both challenges are featured on the main page this week!

AND....don't forget to leave a comment for blog candy from me on this post.  

Happy Stamping!

SK112208


It's Saturday and that means another sketch challenge at Paper Craft Planet.  Tammy created this great sketch for us to play with this week.  There are already so many wonderful cards for your inspiration in the sketch gallery.  Check it out!


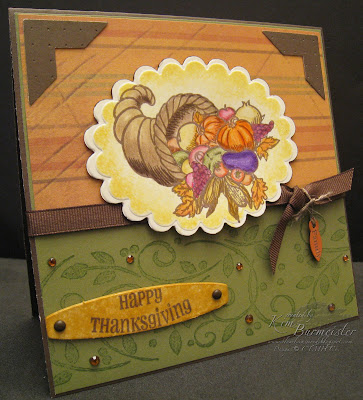
Here is my take on the sketch.  I played with my nestabilities again.  I don't use these cutting dies enough.  Each time I get them out, I love how my image looks.  Since next week is Thanksgiving Day in the US, I thought I would make a card for my in-laws.  We are going there to celebrate and they always make such a delicious meal.  I better get on my Wii Fit this week for sure to work off some calories before the feast...LOL!


Materials used: 

Paper - CTMH - cocoa cs, olive cs, colonial white cs, Abundance pattern paper

Medium - prisma pencils, CTMH watercolor pencils

Ink - Memento rich cocoa, CTMH - buttercup, sunkiss yellow, sunflower, honey. olive

Marker - cocoa

Stamp sets - CTMH - Give Thanks, Say It In Sytle, SU - Leaves & Swirls jumbo wheel

Embellisments - CTMH - dimensional elements bookplates, autumn terracotta photo clip, cocoa ribbon, natural hemp, nature's ambiance rub-on, cocoa brads, Unknown - bling bought at Michaels

Tools - Large Scallop Classic Oval Nestabilities, SU photo corner punch, SU mat pack, paper piercer, sponge


Happy Stamping!

5 Minute Card

I spent a good part of the afternoon working on my blog template.  I am not finished yet, but I did make some major changes.  I am learning a lot about html code and changing it.  Adela from Creation by AR (her blog is below) directed me to this blog to learn how to make some changes I asked her about.  The website is really helpful.  If you are a blogger and want to make changes, you should check it out.  Thanks, Adela!

My friend, Jeanne, posted these type of cards on her blog here.  In addition, she had a link on her blog for Creations by AR, who created a tutorial for these wonderful cards.  Adela did a great job on this!  

I just can't make enough thank you cards for all the volunteers, who worked the open house at my son's elementary school.  I love these cards!  I made 12 cards in record time.  I got to use ribbon I have that doesn't match any of my CTMH paper, but I couldn't live without.  I decided to stamp directly onto the card to make the cards even easier to make.  I used the 2008 October stamp of the month, Annotations and Say It In Style stamp set.  Here are just a few of the cards I made this morning:


I used the following Cuttlebug embossing folders:
  • Swiss Dots
  • Bloom Dots
  • Floral Fantasy
  • Stylized Flowers
  • D'Vine Swirl
The next time I made some of these, I am going to bling them up a little like Adela and Jeanne did to their cards.  I know these cards will be a staple in my card list.

I have a question to answer that I missed in my Guest Book.  Sorry!  I use a circle scallop on some of my cards and it was asked what size I use.  I tried to measure it, and it looks like it is 1 3/4 inches across.  It is the SU scallop punch.

If you have questions, the best place to post them is in the comments section.  The comments are sent to me via email, so I look at them and respond as soon as I can.  BTW, thanks to all of you who make such nice comments about my blog and artwork.  It is really nice that you take the time to leave a comment.  It means a lot to me.  I am glad you like my blog.

Happy Stamping!

Tutorial Time 2-5-7-10 Box

I had fun making this little gift box.  I am always looking for cute ideas to give teachers and hostesses gifts in and this is one is a perfect size and easy to make.  Enjoy!


Measurements:

Juniper cardstock - 8 1/2 x 11 (landscape score at 2, 5, 7, 10 and portrait score at 2 and 7)
Sorbet cardstock - 2 1/2 x 2 1/2
Creme Brulee cardstock - 2 x 2
Sorbet designer ribbon - 12 inches

I used Life's Creation and Say It In Style stamp sets.


Happy Stamping!


Tutorial Time - Create a Shade

I have had this product in my possession for a long time and just never used it. I went to a class at convention and they showed a lot of projects where they used create a shade and now I am hooked. This paint is awesome!

Here are the measurements for the card I show in my video:

Buttercup card base - 8 x 7 (score at 3 1/2)
Let's Get Together paper - 4 1/4 x 2 1/2, 1 1/2 x 2 1/2
Cranberry cardstock - 1 x 3 1/2
Say It In Style stamp set
Cranberry ink, waxy flax and sassy strands
Buttercup brads and button

This card design is from the new Originals Card Confidence Program. The design is called Bound Together found on page 33.

ENJOY!


Happy Stamping!

Wishing You Well

I'm back and BOY....did I ever create at my sister's house. I had so much fun and was so inspired by all the new toys I got from convention. I have been getting ready for my open house this weekend to show off a lot of new stuff and get rid of some old (but loved) items.

Today, Monday, was Tate's first day back to school and tomorrow is my hubby's 40th birthday. We have had a lot going on lately, just like the rest of the world. I have been staying up late, because I get hooked on watching the Olympics. I can't seem to stop watching once I start. It is addictive!

This card is the first of five cards I made with the new Creative Basics Evensong Collection found on page 34 of the new 2008 Fall/Winter Idea Book. This paper is so pretty!


In addition, I used the new Originals Card Confidence Program for the design. This design is a 3 1/2 x 8 card found on page 91 of this awesome must-have book.

I used large spirals like they did in their card design and conchos. In addition, I used new england ivy bigger brads and distressed the edges with the chocolate distressing pad found in the distressing kit. To top it off, I used Cottage Floral and Say It in Style stamp sets. This new paper uses the color Tulip, which is one of the four great new colors. Those of you who love the Reflections, Imagine and Cherish books are going to LOVE this one!

Happy Stamping!

Tutorial Time - Shaker Card

Okay, don't laugh too much during this one. I made numerous mistakes and just kept taping and to show you how to fix them. I had fun making this one, because I laughed at myself. ENJOY!

Meaurements:

Card base 5 1/2 x 8 1/2 score at 4 1/4
Good Times pattern paper 4 1/4 x 5 1/2
Shaker Box 3 3/4 x 3 3/4 outside square, 2 1/2 x 2 1/4 inside square
Colonial White cs 3 1/2 x 3 1/2
Transparency 3 x 3


Happy Stamping!

SC181 Challenge

I finally got my sketch challenge done from yesterday. I really like how it turned out.

This one is for you Mom! When you least expect it, you will get this one in the mail. My mom likes birds a lot. I bought this set, because it reminds me of her. My favorite stamp from the set is this cardinal. I hope I did him justice. The stamp sets are Take Flight and Say It In Style. The paper is Let's Get Together Level 2. The ribbon is from CTMH ribbon round collection and the pearls are from Archivers. The pearls are light blue. I like these little gems a lot.

I used my prisma pencils to color the cardinal and the branch. I used chalks for the sky. To see the details, click the picture to enlarge it.


By the way, here is the sketch from the challenge:


My friend, Jeanne, had a great idea for me for my next video. She suggested I make a card like the last one I posted with the bees, so I did that with the July stamp of the month (available soon) I will create my video tutorial tomorrow (Friday). I should have the tutorial posted by Friday night, so stop by soon.

Happy Stamping!

From Your Side of the Table

As you can see by the title of my new weekend postings, Sherry H has won the goodies. Thanks, Sherry! Please send me your snail mail at stampfest@cox.net. I liked this title, because it seems like we are scrapping together. I would love that! I am always ready to get together will fellow stampers and create.

Nikki Kucharek sent me this card she made using the wood fence technique. Here is the video I made to show how this technique is done. Great card Nikki!


Please send me more artwork. I love to see what you take time to create!

Happy Stamping!

Tutorial Tuesday - Triangle Tri-fold

First, thanks for all the birthday wishes and belated wishes. I had a wonderful birthday this year. Each year just gets better. I love my age, 41, and can't wait to see what the next year brings.

Friday night, took the kids to spend the night at grandparents. Seth and I went out to eat and then we went shopping. Yes, shopping without kids. It was so peaceful. When we were walking out of the mall, we saw a dad getting after his kids and I just smiled. Been there! Then we went to a smoke-free bar, the Ozone and listened to a band. We always end up at that bar, when we go out. My husband plays lead guitar in a band, so we like to go listed to bands.

Saturday, National Scrapbooking Day! I didn't have to pick the boys up until 5 p.m., so I went scrapbook shopping...yeah! I got a new tool and embellishments! You know how I love tools! I will have to show you my new toy in my upcoming tutorials. Then I went to Christi's Uppercase Living party...then more scrapbook shopping. I even made it to confession before I picked up the kids, so I got to cleanse my soul too! What a great two days!

Here is the tutorial for the Just Because card I posted last week. The instructions are from Beate Johns, who posted them on SplitCoastStampers.


Here are the handmade cards I received for my birthday:

My hubby has made me cards ever since we were dating. I keep every one of them. He always makes them show what I am getting for the occasion. This ones shows the map of a Garmin, which I got with all the money I received this year.

This one is from my friend, Terese. This is awesome! Pink and chocolate! All designs are copyright CTMH.

This is from my friend, Christi. She has started making cards and invitations as a side business. The way this one opens is so cute. The flower is a CTMH design.


Happy Stamping!

Just Because - Tri-fold

My friend, Debbie, asked for a Just Because card, so I decided it was time to make one. The 2008 May stamp of the month - Say It In Style - is awesome, because it has so many sayings in different fonts. Just Because is on this stamp set. I will have to say this is a must have for card makers.

I added a link to the CTMH catalogs on my sidebar under My favorite sites. Just click on CTMH catalogs and you will be taken to the list of current catalogs for you to browse. The next one is coming out in May...just a few days. May is a wonderful month...you know! I should of had you guys guess what day my birthday was this week. Hmmm, maybe next year!

My next tutorial will be on this tri-fold card. I got the instructions from the very talented Beate Johns on SplitCoastStampers. Hope you like it!


I used Simple Pleasures Level 2 paper pack, coordinating cardstock and MY Stickease for this project.

Happy Stamping!